


This is a compiler for Pocket Computer created around 1987~1988.
- Compiler and Runtime Library are very compact and can coexist in memory.
- You can edit, compile, and run source code in memory.
- A lot of useful instructions for the game.
- The generated code is small and fast because variables are stored in RAM.
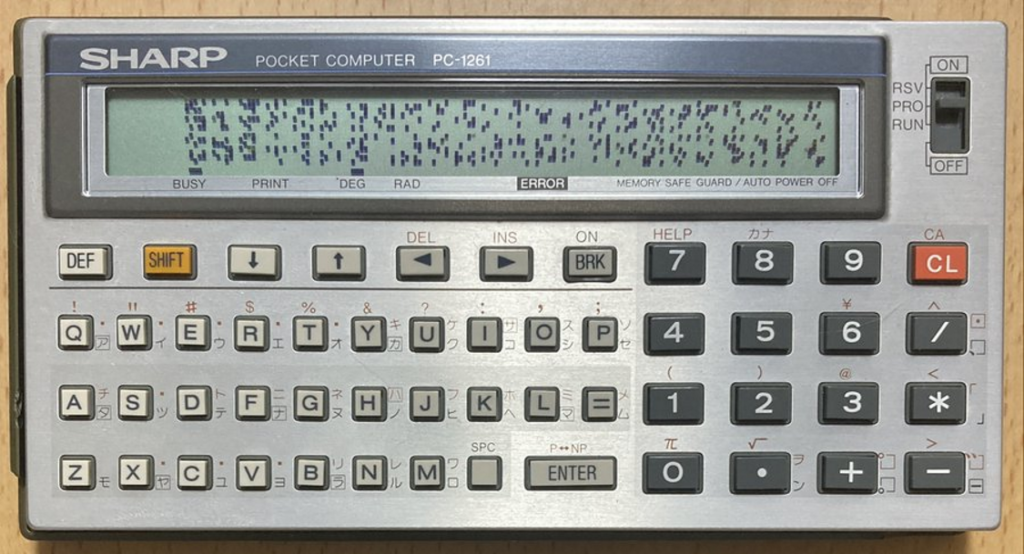
I recently made PockEmul compatible with the LC-3 Compiler for the Sharp PC-1261/1262. It will be part of PockEmul 2.10.0
This required extensive groundwork, as the compiler relies heavily on undocumented features of the SC61860 processor, many of which had not yet been implemented in the emulator.
The compiler enables developers to write programs directly in BASIC, using special instructions, and then compile the code into LM format, all within the pocket computer itself.
It is particularly well-suited for creating fast-paced graphical games.
Originally developed in Japan, the compiler had no existing English documentation available until now.
To address this, I’ve translated the X thread by @poyokoma_danna, which details LC-3 functionalities, and supplemented it with a translation of the official documentation (hiroog/LC3_Compiler: LC-3 Compiler for SHARP PC-1261/PC-1262).
Installation
First, it’s essential to reserve a memory area for the LC-3 compiler to ensure it remains intact while entering BASIC code.
This is done using the EQU # instruction, originally designed to allocate memory for the “Easy Simulation Program” (refer to chapter 9 in the official documentation).
To prepare the space needed by LC-3, enter EQU#43, which reserves 44 × 128 bytes.
Next, load the LC-3 binary at address 0x4000 — there’s a convenient entry in the contextual menu that automates this process.
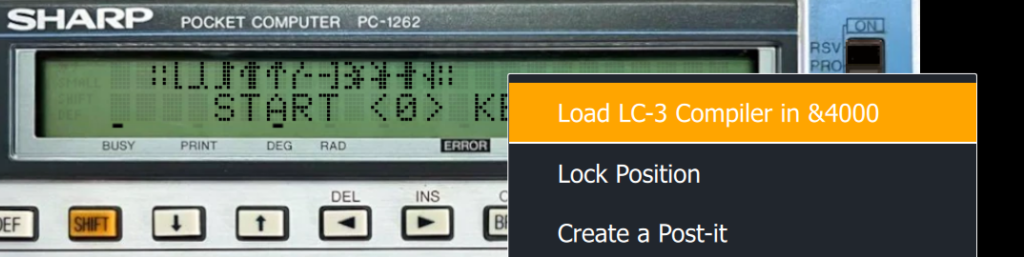
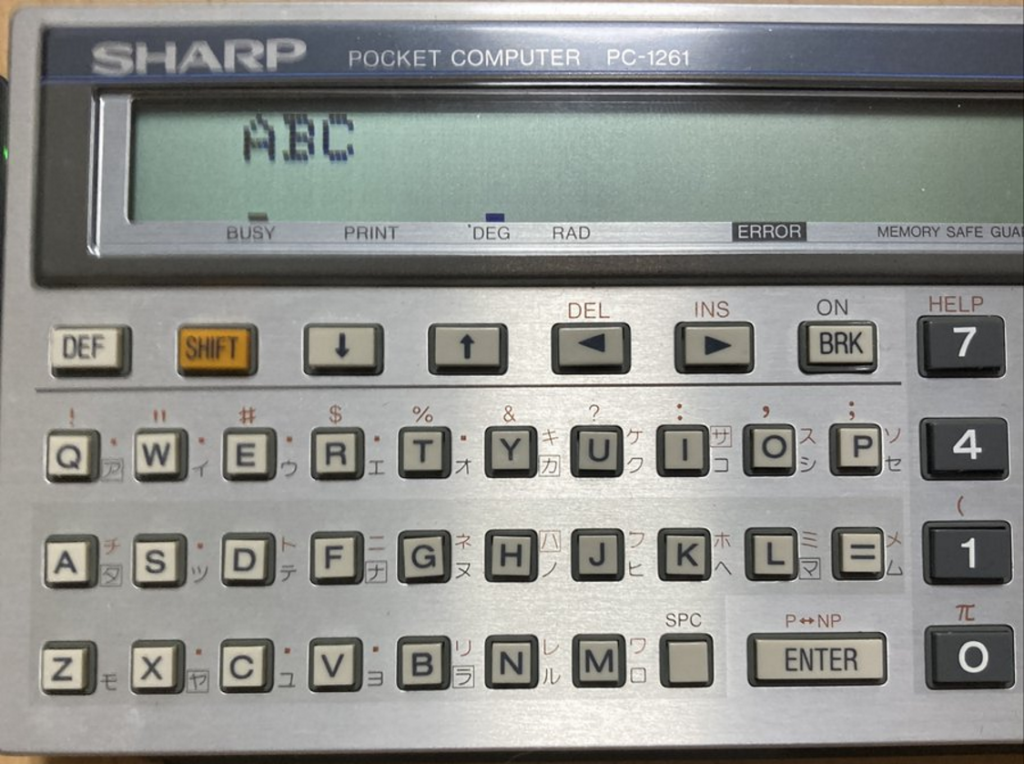
📝 Important: It’s recommended to use the Japanese version of the PC-1262, as the compiler relies on the Yen (¥) character, which is absent from export models.
Now you’re ready to enter your LC-3 source code as if writing a BASIC program.
In PRO mode, follow these steps:
- Enter your source code
- Compile it with : CALL &4000
- If the compilation completes without errors then : CALL &4900 will launch execution
- Use BRK to exit the program
About ERRORS
If an error (Table 2) occurs during compilation, the type of error is displayed, and when you press (up arrow) in PRO mode, the location of the error is displayed (except for ERROR 4).
In the following case, do not press up or down arrow but turn the power OFF first.
- After the error number, IN~ and the line number is displayed.
- It stopped when it displayed anything other than the prompt “>”.
- An error was displayed while running the program, not while compiling.
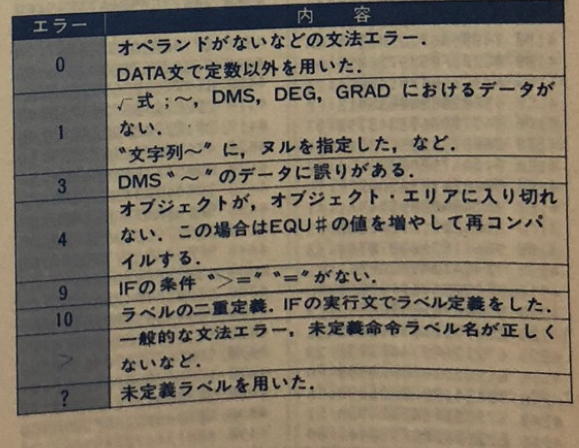
| 0 | Syntax Error, such as a missing operand. A value other than a constant was used in the DATA statement. |
| 1 | √formula;~, No data for DMS,DEG, GRAD If you specify null for “character string” |
| 3 | There is an error in the DMS *~* data |
| 4 | The object does not fit in the object area. In this case, increase the EQU# value and recompile |
| 9 | There is no IF condition >== |
| 10 | A label was defined twice or inn IF statement |
| Common syntax error, undefined instruction, incorrect label name, etc. | |
| ? | An undefined label was used |
Expression definition
Constant 0-255
If you write a value greater than 255, the reminder when you divide it by 256 will be used.
Character constant “1 Character”
This value is the ASCII code of the character (one character). In the case of a string, only the last character is valid.
Variables A-Z,@
There are 27 of them.
You can switch between the “front” and “hidden” variables using the VAL command.
Array Variable √expression
You can use 256 variables, from √0 to √255.
Example:
√1=2 → Stores 2 in array variable 1.
A=23:√A=4:√A+1=5 → Stores 4 in array variable 23 and 5 in array variable 24.
The array √96-√255 is also used as the data area for defined characters. Five arrays correspond to one character, and are written in reverse order:
√96-√100 are No 0 and a maximum of 32 characters can be defined.
Functions
You can omit parentheses for functions that require arguments.
However, be careful about how you handle the arguments.
Example:
EXP 2 + 1 -> 8
EXP 2 ) + 1 -> 5
Operators
- +ー*/ are the usual arithmetic operations.
- % gets the remainder
- OR, AND can perform logical operations
Overflow is ignored, and the lower 8-bit value is returned.
Fractions from division are rounded down.
Dividing by 0 returns 255.
There is no operator precedence, and operations are executed from left to right
A=3+5*2 becomes 16
To follow operator precedence, use parentheses
A=3+(5*2) becomes 13
If you use multiple layers of arrays, functions and parentheses, the stack may run out of space and the program crash.
Keep the number of layers, including arrays,function and parentheses, to three or less.
A = √ ( ABS B ) ) ) Correct
( √ A + SGN √ B ) ) ) not correct
( √ A ) + SGN √ B ) ) ) Correct
Functions
INKEY$
Returns the character code of the key pressed during real-time key scanning
If no input is detected, it returns 0
It cannot detect multiple keys simultaneously
If multiple keys are pressed, it returns 1
Since it returns a character code, let’s talk about characters
A “single character” corresponds to a 1-byte numerical character code
If multiple characters are specified, it returns the code of the last single character
Some keys not included in the character code are also specified
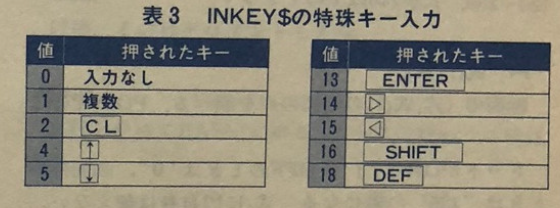
| 0 | No input |
| 1 | Multiple keys |
| 2 | CL |
| 4 | Up arrow |
| 5 | Down Arrow |
| 13 | ENTER |
| 14 | Right arrow |
| 15 | Left arrow |
| 16 | SHIFT |
| 18 | DEF |
Sample:
10 CLS 0:X=0:Y=0
20 %A:TRON X,Y:WAIT 30
30 A=INKEY$:IF A="4":X=X-1:IF X=255:X=119
40 IF A="6":X=X+1:IF X=120:X=0
50 IF A="2":Y=Y+1:IF Y=14:Y=0
60 IF A="8":Y=Y-1:IF Y=255:Y=13
70 GOTO %A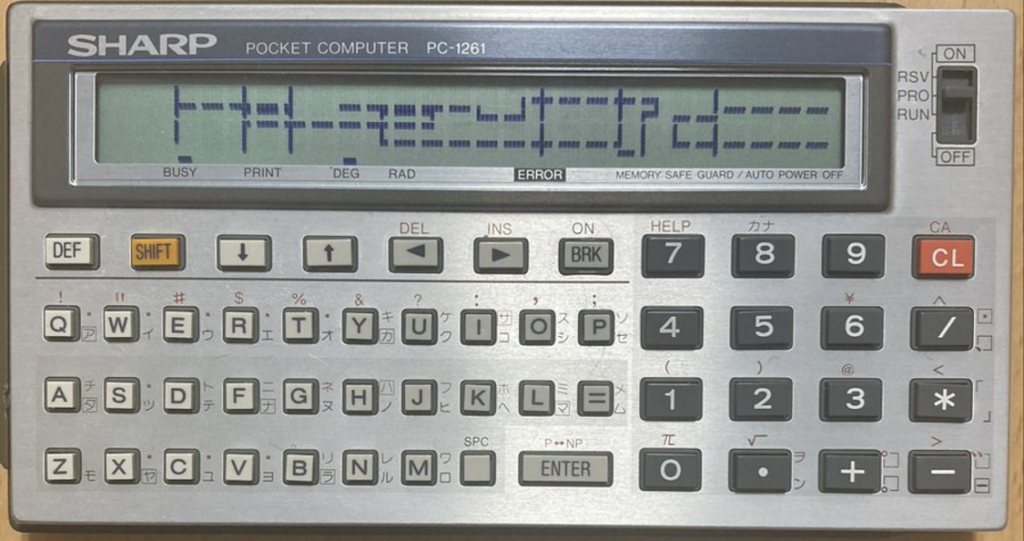
INPUT
Wait for one character to be entered, SHIFT characters and kana can also be entered.
When pressed, it returns the character code.
The code is almost the same as INKEY$, but some keys can be obtained while others cannot.
The functions and special keys are as shown in table below
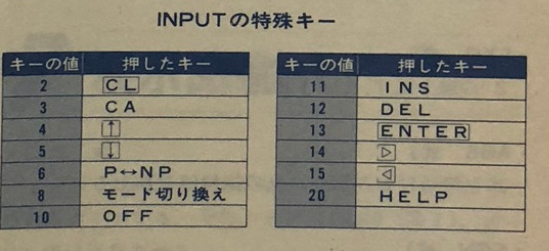
| 2 | CL |
| 3 | CA |
| 4 | Up arrow |
| 5 | Down arrow |
| 6 | P <-> NP |
| 8 | Mode switching |
| 10 | OFF |
| 11 | INS |
| 12 | DEL |
| 13 | ENTER |
| 14 | Right Arrow |
| 15 | Left arrow |
| 20 | HELP |
INT
Simultaneous key input:
When a key in Table 4 is pressed, the bit becomes “1”.
For example, if 8 and 6 are pressed, 2+128=130 is returned
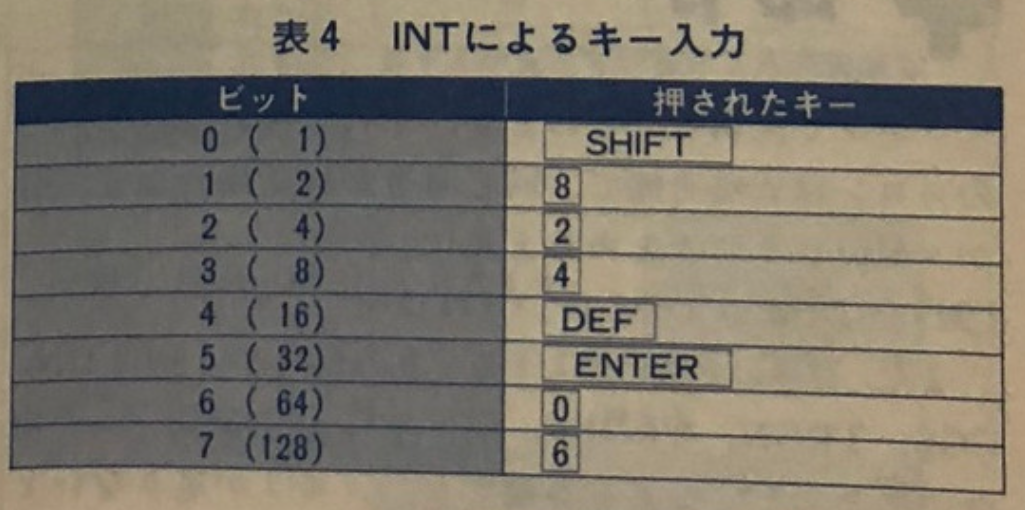
| 0 (1) | SHIFT |
| 1 (2) | 8 |
| 2 (4) | 2 |
| 3 (8) | 4 |
| 4 (16) | DEF |
| 5 (32) | ENTER |
| 6 (64) | 0 |
| 7 (128) | 6 |
AREAD
Pops a byte value from the data stack.
Equivalent to POP (PUSH is DIM)
READ
Read the data specified by RESTORE in order.
Even if it is the very first data, it must be specified with RESTORE beforehand.
If there is no data for READ, the value read is undefined.
RND exp
Give a random number in the range of 0 to exp-1 (expression number)
If expression is 0, a random number between 0 and 255 is given.
PEEK exp
When exp is 0 to 239, the corresponding contents of V-RAM (video RAM) are read.
V-RAM is 0 to 119 from the top left of the screen, and 120 to 239 from the bottom left.
When the expression is 240 or greater, the result is 0.
PI exp1,exp2
Check the coordinates of the point (exp1,exp2) on the screen.
When the dot in ON, the value is 1, when it is OFF, the value is 0, and when it is off the screen, the value is 225.
PI itself cannot be used in an expression
LOG exp
Return the value of LOG2 exp, truncated to the nearest integer.
EXP exp
Return the value of 2 power exp. For bit operations.
ABS exp
Treats the expression as signed and gives it absolute value.
SGN exp
Gives the sign of the expression as signed: 1 for positive, 255 for negative, 0 for zero.
Instructions
You can write multiple command on one line by separating them with a colon.
This colon is optional and it is a good idea to group the same commands together to make them easier to understand
Example: DIM A DIMB : GOTO ~
You can also omit :
- The = when assigning to a normal variable.
- The , after PI, ON, COS, TRON, TROFF and SIN
- The “” after the DMS and ~ commands
This is useful when you are short of memory
Memory and Data instructions
Variable = expression
You can’t use LET to assign a value to a variable.
Instead, use a colon in an IF statement
Example: IF A < 8 : A = A + 1
Array variable = expression, [constant 2, constant 3, …
Assigning to an array variable. In this case, the array name does not need to be enclosed in parentheses, and consecutive assignments can be made.
Example: √0=7:√1=5:√2=0
can be entered as: √0=7,5,9
Array variable; hexadecimal data~
Assign consecutive hexadecimal values. This can be used in defining characters directly in an array.
When assigning consecutive values to an array, be careful not to exceed √255
CLEAR exp
Clear an array variable with the value of an expression.
VAL
Replace 27 variables with hidden variables.
DIM exp
Write a byte value to the data stack.
The data stack as a total of 128 levels, connected like a ring and can be PUSHed (DIM) and POPed (AREAD) as many times as you like.
Also, even if you stop the execution, the contents remain.
If you press CLEAR ENTER directly, it will become 0, so it can used for high scores, etc …
RESTORE label
Specify the data to be read with READ. Use the DATA statement when the data is in decimal, and !~ when it is in hexadecimal.
DATA constant, [constant 2, constant 3, … ]
Write the value of a constant (character constant) directly to the object. When executed, it will be treated as machine code, so place it after END.
! Hexadecimal data
Write the hexadecimal value directly to the object.
There are sub commands
- < Go back one address
- > Advance one address
- +Label Write the label value.
Control Instructions
Label
The label consists of 2 characters:
- The 1st character is one of #, $, &, % (4 options)
- The 2nd character is one of A-Z, @, ;, <, =, >, ? (32 options)
These are combined for use.
Personally, I find that mixing in symbols that could be mistaken for other uses makes the program harder to read, so I mainly use # with A-Z.
GOTO label
When using GOTO, you can use ^ as a label.
This represents the start of the definition line.
By setting the start of a line as the beginning of a loop or similar, you can save labels without needing to define them.
10 GOTO ^
This creates an infinite loop. (Note: The booklet explains the above, but in practice, running it will require stopping with a reset.)
Sample using GOTO and variables:
10 A=0
20 #A:CURSOR A:"(PC-1261/2)"
30 A=A+1%64:WAIT 5:GOTO #A
GOSUB label RETURN
This is pretty standard.
It jumps to the label as a subroutine, and returns to the original process with RETURN.
ASN
It’s not used often, but it moves back one level of subroutine nesting.
When you jump to a process with GOSUB but want to jump elsewhere with GOTO, the nesting of subroutines can become an issue.
So, you can move back one level and continue processing without needing to RETURN.
Sample:
10 A=0
20 %A:GOSUB &A:A=A+1: WAIT 5: IF A<65 GOTO ^
30 GOSUB &A:A=A-1: WAIT 5: IF A¥0 GOTO ^
40 GOTO %A
50 &A: CURSOR A:"(PC-1261/2)":RETURN
IF
The second aspect of control is IF and conditional expressions
① IF conditional expression GOTO label
If the conditional expression is true, it jumps to the label
② IF conditional expression: execution statement…
If the conditional expression is true, it performs the processing from the execution statement onward
The following four conditional expressions can be used:
- = : Both sides are the same
- ¥: Both sides are different (equivalent to ≠, !=, <> in other languages)
- < : The left side is smaller
- >= : The left side is the same or larger
When an expression or variable is used in the conditional expression, it is considered true if it is not 0
③ IF conditional expression GOTO label: execution statement…
Surprisingly, an ELSE function exists.
If the conditional expression is true, it jumps to the label
If the conditional expression is false, it performs the processing from the execution statement onward
With the introduction of conditional expressions, it feels like we can somewhat achieve movements reminiscent of the Lummy-Bahn title
10 A=0
20 $A: CURSOR A:"(PC-1261/2)"
30 A=A+1: WAIT 5: IF A<65 GOTO $A
40 $B: CURSOR A:"(PC-1261/2)"
50 A=A-1: WAIT 5: IF A¥0 GOTO $B
60 GOTO $A
RUN
This command initializes the program and re-executes it from the beginning (replay command).
The “initialization” is exactly the same as when you call CALL &4900, and the details are as follows:
- Set the stack pointer
- Clear variables and hidden variables
- Settings the data stack pointer
WAIT n
This creates a wait of approximately n*0.004 seconds
Additionally, pressing BRK will terminate the program
When n=0, only the BRK press is checked
Combined with the previous text display
10 “ABC”:WAIT 100
PAUSE n
If no key are pressed, WAIT for n*0.004 seconds
STOP
I was using WAIT for display waiting, but I forgot there’s a command for key waiting : STOP
It pauses until a key is pressed (except for SHIFT, DEF).
It seems to repeat if held for more than a second, but I don’t understand the point of this feature.
In reality, if you keep holding a key, it seems to disable the key press just once.
You can’t disable it again by holding for another second. (What’s that about? Maybe a design choice?)
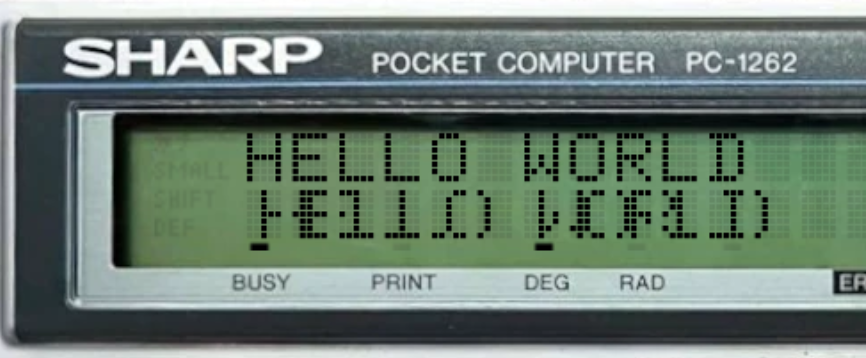
10 CURSOR 0:"HELLO WORLD":STOPIf you set it up like this, it waits for a key press.
REM ~
From now on, this line will be commented
END
Stops execution and return to BASIC. Can be omitted at the end of the source code.
. (period)
This mark the end of the source code. Anything after this point in the program will be ignored
GRAPHICS
The LC-3 has several ways to display arbitrary graphics.
The first is defined characters (pseudo-PCG).
Regarding the description of “strings” in the display command, if you include the π symbol in this string, you can switch between regular characters and defined characters.
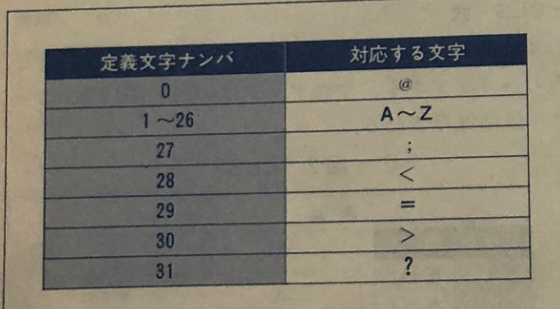
Defined characters can use the 32 characters “@ A-Z;<=>?”.
Now, you might be wondering about switching, but how do you define the characters?
In fact, array variables 96 to 255 are designated as the storage area for defined characters, and by storing graphic data there, you can easily display them.
There’s also a way to easily set defined characters in array variables.
How to use defined characters:
① Store the data for defined characters in array variables.
At this point, 1 character uses 5 bytes, set from the right to the lower indices of the array. (This part isn’t very intuitive, but it’s probably due to aligning with the layout of the font data in the ROM.)
Example:
√101:14555D7F551400140014
√ArrayNumber:2-digitHex…
In this format, values are continuously set in the array.
② In the character display, insert π to switch the display, then write the corresponding characters.
Example:
“πAB” (Character display always starts with regular characters, so there’s no need to switch back to regular characters at the end of the string.)
It’s a bit tricky to get the hang of, but you can easily display graphic characters this way.
Sample:
10 √101:14555D7F551400140014:"πABBB":STOP
Display Commands
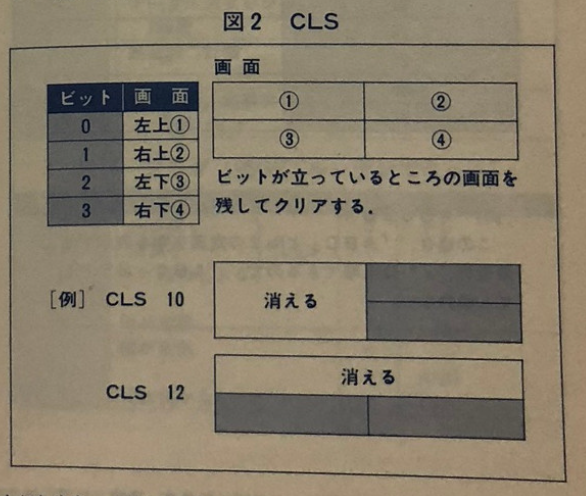
CLS n
Clears the parts of the screen where the bit specified in n is 0
Bit 0: Top left
Bit 1: Top right
Bit 2: Bottom left
Bit 3: Bottom right
CLS 0 clears the entire screen
CURSOR exp
Once text can be displayed, the next step is specifying the display location.
exp: 0 to 239
The display position is specified in dot units, not character units, with n going up to 239.
The top-left is 0, the bottom-left starts from 120, and any portion exceeding the top-right will be displayed from the bottom-left, while any portion exceeding the bottom-right will be displayed from the top-left.
If exp is set to 240 or higher, the display will disappear until CURSOR is set to 239 or lower again. (Not sure what this is useful for, but maybe for debugging by moving the display position with a variable and turning the debug display ON/OFF? )
10 CURSOR 0:"HELLO WORLD"
20 CURSOR 122:"HELLO WORLD":WAIT 255
You can see how it allows specifying in dot units like this.
PRINT expression
Display the value of an expression at the cursor’s position
LPRINT expression
adds a leading 0 for single-digit numbers, displaying them as two digits.
Sample:
10 CLS 0
20 CURSOR 0:"COUNT:":LPRINT A:A=A+1:WAIT 10:IF A<100 GOTO ^:A=0:GOTO ^
CHR$ expression
Display the character corresponding to the value of the expression.
If expression value is between 0 and 31, the defined character is displayed.
Example:
10 CLS 0:CURSOR 120:"PUSH ANY KEY"
20 A=INPUT:GOSUB %B:A=" ":GOSUB %B:GOTO ^
30 %B:X=55
40 CURSOR X:CHR$ A:CURSOR 115-X:CHR$ A:X=X-5:WAIT 5:IF X<240 GOTO ^: RETURN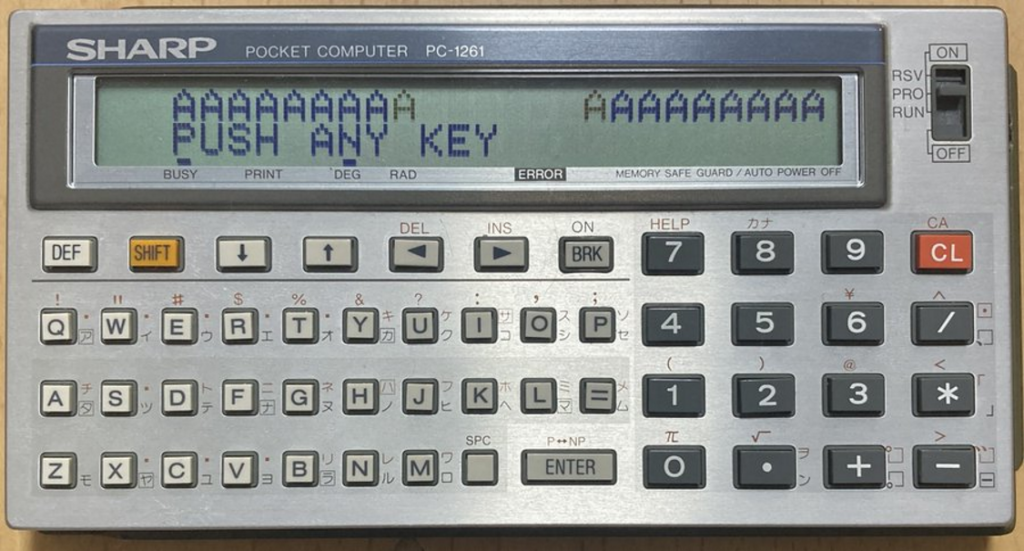
DEG Two-digit hexadecimal…
Draw graphics at the position of the text cursor without using text display.
With defined characters, you need to create characters in units of 5 dots, but this allows you to create them freely without worrying about the number of dots.
Also, unlike defined characters, it sets the data from the left, so it might be easier to understand. Since it’s treated as a text cursor, the handling of parts that exceed the right edge is the same as with text display.
10 DEG 140014001414555D7F55
POKE expression
Write 1 byte of data at the text cursor position and display it.
While DEG has a variable size but fixed data to write, and defined characters need to set data in an array in 5-dot character units, this allows writing arbitrary values one dot at a time.
Also, since the text cursor wraps around from the right edge to the left edge for any overflow, it’s not suitable for effects like appearing from off-screen.
With POKE, you can achieve this by adjusting the number of displayed dots while displaying one dot at a time.
Sample :
10 %C:A=1:WAIT 19
20 √0:000000000000000000000000000000404060686C7F7F7F7F6F6741406020
30 √30:00020203060606070F0F0F0F0F2F2F2F6F7F7F6F2F2F2F0F0F0F07070F09
40 GOSUB %B:A=A+1: WAIT 19: IF A<30 GOTO ^
50 GOSUB %B:A=A-1: WAIT 19: IF A>=1 GOTO ^
60 GOTO %C
70 %B:B=A:C=0:CURSOR 120-A
80 POKE √C:C=C+1:B=B-1:IF B\0 GOTO ^
90 B=A:C=30: CURSOR 240-A
100 POKE √C:C=C+1:B=B-1:IF B\0 GOTO ^
110 RETURN
Graphics Instructions
ON x,y
Specifies the coordinates of the graphic cursor.
The graphic cursor changes only with this command.
If x is 120 or more, subsequent GRAD or COS will not be executed.
X and y can use world coordinates from 0 to 255.
GRAD hexadecimal data~
Displays the graphics of the hexadecimal data at the x,y coordinates specified by ON (Can draw the same data as DEG with dot-level position specification)
The y-direction is effective only within the screen display range in world coordinates
The x-direction ranges from 0 to 119; values outside this range are ignored Additionally, any portion that extends beyond the right edge of the screen is displayed from the left edge
COS m,n
m: Value to take AND with the screen
n: Number of dots to erase – 1
Takes AND with the value m from the x,y coordinates specified by ON, effectively erasing the graphics
Neither GRAD nor COS changes the coordinates set by ON when executed
Sample :
10 CLS 0:X=0:Y=0:Z=1
20 %A:ON X,Y:GRAD 0106060202:WAIT 20:COS 248,4
30 X=X+1:IF X>=116:X=0
40 Y=Y+Z:IF Y=252:Y=253:Z=1
50 IF Y=14:Y=13:Z=255
60 GOTO %A
TRON x,y
Draw a point on the screen at the x,y coordinates.
Sample :
10 CLS 0
20 WAIT 0:TRON RND 120,RND 14:GOTO ^
(In such loops, make sure not to forget WAIT 0 to enable the BRK check. Otherwise you will have to reset the computer)
TROFF x,y
Erase a point on the screen.
World coordinates can be used, both x and y can be specified from 0 to 255
Sound Instructions
BEEP exp
0: BEEP OFF
1: Output &11 to C port
2: BEEP 2kHz
3: BEEP 4kHz
There is no length specification, so you need to use WAIT yourself
Sample
10 BEEP 2:WAIT 100:BEEP 3:WAIT 100:BEEP 0SIN exp1,exp2
Plays a sound at frequency exp1 for duration exp2.
The value set for exp1 is from the table of values for DMS mentioned previously
Sample:
10 CLS 0:CURSOR 0:"PUSH 0-9 KEY"
20 √0:70635751473E35332C26
30 %A:K=INKEY$:IF K<"0" GOTO ^:IF "9"<K GOTO ^
40 SIN √K-"0"),5:GOTO %A
DMS “string”
This is a command to play music when an MML-like command is written in the string.
Processing stops until the playback is complete (You cannot perform other actions while playing BGM)
The MML is structured as shown in the diagram
Side note: The SC61860 Pocket Computer can only sustain buzzer sounds at 2kHz and 4kHz
Other frequencies require the CPU to manually turn the buzzer ON/OFF to create the desired frequency
As a result, when the CPU is producing sound, it cannot perform other tasks
Sample:
1 DMS "8ACEFEC9A6=8EFHJHF9E"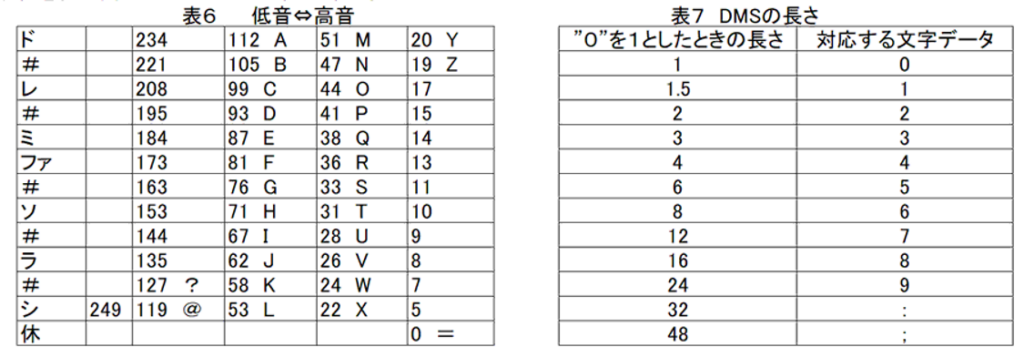
I can’t uninstall pockemul. It gives me the following error message:
Internal Error: Cannot find utCompiledCode record for this version of the uninstaller.
That error message—“Internal Error: Cannot find utCompiledCode record for this version of the uninstaller”— usually means the uninstaller is missing critical data files or has been corrupted. Here’s how you can tackle it:
🛠️ Step-by-Step Fixes
1. Manual Cleanup via Registry
If the uninstaller is broken, you can manually remove its traces:
Press Win + R, type regedit, and hit Enter.
Navigate to: HKEY_LOCAL_MACHINE\Software\Microsoft\Windows\CurrentVersion\Uninstall
Look for entries related to PockEmul. Right-click and delete them carefully.
⚠️ Be cautious—editing the registry can affect system stability if done incorrectly.
2. Delete Leftover Files
Go to the folder where PockEmul was installed.
Delete all files manually, especially any named unins000.dat or unins000.exe.